Palm Weaving:
The Story... and The Art
By Sister Cecilia Schmitt, EdD OSF
There are endless uses of palm on stationery. You could make a palm ornament by using an extremely narrow strand of braided palm and affixing a card. Or one might take a tiny 3-strand braid, shape it into a heart or circle, affix it to a card and maybe add a picture, ribbon, or ornament.
For folks who do much reading, the palm cross bookmark will remind them of the presence of God as they read. Here the tiny cross made with a punch will be very easy to use. Because there is a great deal of shuffling in and out of the book, it is wise to dry it well and cover with contact paper or laminate it.
Religion teachers can introduce the art of using palm by creation a piece called "Crosses on a Hill". Simply make 3 vertical beams and 3 shorter cross beams and paste construction paper. This can also be a lesson in perspective when children make the closer cross larger than the others. Press under a heavy book for three weeks. Click on any image to see a larger version.
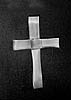
 A-4 The Thumb-Tack Cross
Our ancestral fathers often cut 2 pieces of palm to make a "thumb tack cross". They would make a cross of these two pieces and place a thumb tack in the middle, attaching the cross to a doorway in the barn or shed. Their strong faith told them that the blessed palm would protect them from the dangers of fire, theft, and storm.
There are many ways to do crosses. One way is to fold the palm to make vertical and horizontal beams, then staple or sew the center. The cross can be decorated with a picture or ribbon.
 A-5 The Folded Cross
Trim a piece of palm and cut to about 10" and cut another to about 5". Fold the longer piece so the ends meet about 2" from the top of the back side. Staple in place. Fold the second piece so the ends are also in the center and place this as a crossbeam on the cross. Staple, sew, or glue the center. If you wish, you can secure the center by wrapping a narrow piece of palm or the tough rib. Press until dry.
 A-11 The Folded Aura
This is the easiest design possible. Take 2 leaves of equal width connected at the bottom and fold one over the other at 90° angles. Continue to fold one over the other holding the folds tightly with the left thumb. If it gets too large to hold, leave some go and keep holding the new folds as you make them.
You can use the aura to encircle a bouquet of other palm designs. It can be made into a kind of crown to be placed on a crucifix, made into a heart-shape and decorated and, if made small enough, can be used as a border for pictures. In bouquets it can hang loosely in a cascade effect.
 A-12 The Circular Folded Rose
You need 2 tapered leaves of equal length connected at the bottom. The rose will have a center only if the palm leaf is tapered and becomes smaller as you fold. The width of the palm can be up to 1/2" at the base.
Beginning at about 2" from the base, fold one leaf back, slanting 45° to the left (1), fold the other leaf back, again at a 45° angle under it (2), fold the first under again continuing in in a counter-clockwise motion, bringing the "rose" as it is now appearing, over the front of the stem (3). Since the palm is tapered, the rose begins to become smaller as you continue. When you feel you have a nice rose, secure the center with a pin or inserting the ends into the weave. You can either trim the ends, or let ends spin off. The center of the rose can be decorated with sequins, a tiny ribbon, or just a knot. It does not need to be decorated if done well. Roses look nice alone or in a bouquet of roses. A palm rose bouquet is welcome as a gift to the person who has everything money can buy! If hung on the wall, the roses can open and hang down, forming a nice spiral. Some leave the folds tufted, not pulled tight, for a rounded effect.

Roses can also be made into a circle with tape or by stapling; they can be placed next to each other on a cardboard cross. Tiny roses can be made into corsages. Give a corsage or bouquet of blest roses to a family who has lost a loved one. Make the number of roses you place in the bouquet significant. Perhaps you can have 7 roses for the years of a child's life.
 A-18 The Square Cross
1. Cut 2 strands of palm about 1/2" x 14". Place the ends of the 2 strips together to form a right angle. Bend #1 down and around the back to make a loop around #2.
2. Fold #2 behind and bring it through the loop in front.
3. Bring #1 through the top of the loop to create the top of the cross. Loop #2 through the same side in the same manner to create the left side of the cross.
4. Tuck the loose ends of #1 and #2 into the center to finish the bottom and right side of the cross.

Introduction to the Cone Patterns
The pattern referred to here as "The Square Cone" is often called the "grape". Since this is the most traditional of all patterns, it has been carried down through the ages. However, it really never had a name. Some just called it "palm braiding". Others called it the pyramid, the basket, the bird's nest, the rosebud, etc. Sailors called it "boondoggling".
Children (and sometimes their parents, too) struggled every year to remember how to start the cone. It is one of the more difficult pattern but as diagrammed here, will be easy to do. There are actually 5 kinds of cones as shown here. It is best to begin with the square cone.
 C-1 The Square Cone
Take a palm which has 4 strands or make 4 strands by slitting palm pieces, stapling palm together if they are not already joined at the base. Your width of palm will determine how large your piece will be.
If you have very long pieces of palm you might consider cutting them in half and using the tapered end for your cone since a tapered leaf makes a nicely shaped piece.
Take 4 strands connected at the bottom. Begin by bending one strand away from you (pointing north), another strand over this and pointing to your left (pointing west), another strand over this toward you (pointing south). The last strand will point to your right and be placed over the 3rd and under the 1st (pointing east). Thus you have a strand going in each direction and are ready to weave.
Pull the braid tight and continue to fold the strands in 4 directions, weaving the 4th strand under the 1st. The children chant, "1, 2, 3, weave". You will braid clockwise then counter-clockwise, beginning with any strand. To speed up the process, try to have only one weaving leaf and trim the end for easy weaving. Otherwise all 4 ends need to be trimmed. Watch that your weaving is even and the tightness of the weave is consistent for nice looking piece.
Finish by putting a pin in to secure the tightness. Remove the pin when dry. One can simply trim the ends or leave them curl on their own. Others pull the ends together and tie them; others tuck in the ends. A highly artistic look can be achieved by making a loop with the ends and passing some loops of thin strands of palm into the loop. The cone then has a "bow" at the top.

 C-2 The Interrupted Square Cone
Begin as explained in Patter C-1. Weave 3 or 4 round of palm. Loop a bit of the palm then begin braiding again. One can make a very attractive series of braids interrupted by loops. These make beautiful palm bouquets. The interrupted cone can become a Christmas tree ornament.
 C-3 The Circular Cone or Rosebud
It is begun the same way as the square cone (C-1). However, after the first round, one slants the palm strand when placing it on the palm piece instead of placing it squarely across. That is:
1.Weave from South to Northwest.
2. From West to Northeast.
3. From North to Southeast.
4. From East to Southwest and continue.
Every 4th strand is woven under the first. The weaving pattern is the same except that the strands are placed diagonally over the other strands and the result will be round instead of square in shape.
A "Combination Cone" is also possible by combining the round and square cone patterns. Make one square round, then one diagonal round, or any combination you wish.
A fascinating variation of the cone pattern is the "Rat Race" cone which goes in both directions. Begin the square weave, split the 4 strands into 8 strands and weave, going one direction and then the other.
 C-12 The 4-Strand Plait
Cut two strips of palm leaf about 1/2" wide and as long as possible.
1. Double one piece and insert the middle of the other piece inside the fold, thus dividing the piece into 4 strips.
2. Fold strip #3 in back of #1 and next to #2.
3. Weave or plait strip #4 over #2, under #3, next to #1.
4. Fold #1, the outside strand on the left, under #4, next to #3.
5. Plait #2, the outside strand on the right over #3, under #1, and next to #4.
6. Repeat the above, folding and weaving from one side then the other until you reach the end of your strands.
If narrow strands of palm are used, the resulting braid or "plait", as it was called by the pioneers, can be used as a halo or encircling band in a bouquet or arrangement.
This is much easier than you might think. And by making two of these and combining them, you can create a cross.

 C-21 The Monstrance
Here is one way to make a monstrance. The pattern shown here has the top piece made like the loop bouquet pattern (B-4). The loop, however, is made about 3" in diameter and the weaving around the center of the loop results in a large center weave which is about 1" in diameter.
The bottom is made much like the chalice. Select 5 pieces of palm rib and make a sort of "wheel". One can place narrow strands of palm in a large darning needle and weave around these spines. Begin the weave at the top, securing the rib pieces. As it dries it will need to be held in place with clothes pins. Connecting the top and the bottom are palm braids reinforced by palm rib pieces. There are more patterns in the Supplement of this book.
 C-22 The Symbol of a Dove (The Bird)
The dove is one of the most popular decorations of arrangements, for the desk, for mobile, or to hang on the door or the wall. You can put it at the end of a rib of palm, the Zig-Zag (A-20) or hang it on a string.

1. The dove is made from two separate leaves of palm. Start with two even and similar palm leaves, 12" to 20" long. Trim the leaves of their hard rib and split each of the two leaves evenly into four strands, leaving about 6" of the butt end of the leaf unsplit. The unsplit end of the palm leaf will become the wings of the dove and will be trimmed in the final step.
2. Leaf A is in your left hand and leaf B is in your right hand and the four strands of the leaf that you split are numbered 1 through 4, top to bottom. Fold strip A1 down perpendicular over the top of the other strands and crease it firmly. Then weave it over A2, under A3 and over A4. Fold strip A2 down perpendicular over the top of A3 and A4, crease it firmly, and weave it over A3 and under A4 (the opposite of what you did with A1).
Do this exact same weaving pattern to leaf B except that its weave pattern is done the opposite of leaf A. This means that since strand A1 is over the top of A4, B1 needs to be under B4. It is imperative that these two halves are woven opposite of each other for the rest of the weaving process to work.
3. Weave strands A3 and A4 together with B3 and B4. Also weave A1 and A2 together with B1 and B2. This brings the two halves of the dove together, and there should be continuous over/under weave pattern for each of the strands.
4. The dove gets placed on a flat surface at this point, and the part facing up is the belly of the bird (so put the worst side up at this point). Pull strands B3 and B4 over the bird, but do not crease them. Pull A3 and A4 over the top also and weave them into B3 and B4 making sure that A3 and B3 stay crossed in this weave pattern (refer to the video for a demonstration).
5. Pin the strands from step 4 under your pinky finger or the edge of your hand and pull strands A1, A2, B1, and B2 up like you just did in step 4 and weave them together. Also be careful that they are properly crossed in the weave pattern or they will not weave together properly in the rest of the dove.
6. A1, A2, A3, and A4 are now woven together on the left side of the dove. B1, B2, B3, and B4 are woven together on the right side of the dove. Each of the strands should have an over/under weave pattern throughout the entire dove at this point. The body of the dove is a loose, open weave pattern which will now stay together without holding onto it at this point.
7. The opening at the top of the dove created when strands A3 and B3 were pulled up and over to star forming the belly of the bird are where A1, A2, B1, and B2 all pass through to form the head of the dove. Since A2 last passes over A3 in the weave pattern, it passes under both B3 and B4 to come out of the opening for the head. A1 is under A3 and thus goes over B4 and under B3 into the opening at the top of the dove. B2 is under B3 and thus must go over A4 and under A3. B1 is over B3 and is now passed under both A3 and A4.
8. The opening at the bottom of the dove created when strands A1 and B1 were pulled up into the belly of the bird become the opening where A3, A4, B3, and B4 pass through to form the tail of the dove. A4 is under A1 so it is now woven over B2 and under B1 into the opening for the tail. A3 is over A1 so it is woven under both B2 and B1. B4 is over B1 so it is passed under both A1 and A2, and B2 weaves over A2 and under A1.
9. Tighten up the weave pattern of the body of the dove by pulling each of the strands one by one, no more than an inch at a time. Start on either end of the dove, pull the 4 strands one at a time, and switch to the other end of the dove to do the same. Continue doing this until you have a nice, tight, even body of the dove. If it is lop-sided pull on the strand that straightens the body of the dove. out. Since the palm leaves dry out and shrink over time, it is important that you pull the weave pattern very tight and close together.
10. Align the 4 strands for the head, and tie an overhand knot to form the head of the dove. Leave the neck the length you desire and crease the knot firmly. Trim the ends of the strands off at an acute angle (60° - 80°) as shown in the video to form the doves beak.
11. Align the two wings together and cut them off at the same length. They may also be trimmed and shaped in various ways to look like wings of a dove.
12. Trim the 4 strands for the tail. They also may be curled, kept extremely long, or split ;and frayed for a more full appearance.
 C-23 The Symbol of the Christian: The Fish
The fish was the symbol for the Christians and is still symbolic of the church.
1. Begin by cutting 2 lengths of palm 20". Fold in half. Insert the base of #1 into #2 to form a "V" shape. The right palm strip is always on top.
2. Leave the two front strips dangle.
3. Taking the back strips, bring #1 around and to the left.
4. Take #2, go behind and down through the loop in the center. Slip the right front top strip back in place.
5. Continue with #2; loop over #1 and weave into same loop and step 4.
6. Turn the fish over taking #2 and bend over.
7. Take the bottom strip and go under the 2 remaining strips and roll over and lay along side.
8. Take next lower right strip and weave over and under. This completes one side of the fish.
9. Flip fish over, take top right strip and lay over as step 7 then weave as step 8.
10. Trim ends. You may add pieces for a tail.
Another way to create an interesting pattern is to place a knot in the end of a strong palm rib and insert it into the fish. It looks like a fisherman's joy!
